White Bedcover. White Silk Cloth. White Ceiling
I met Mariam on Instagram in late 2015 had a conversation with her and we ended up being friends. The friendship developed through snapchat. I like following the models I intend to want to work with on snapchat so as to know what type of personality they have. This helps me because I will know what to expect on the shoot. Yes, you could call it some kind of audition. By then I was in Arusha working for School of Jude a charity organization. So, we planned to do the shoot when I am Dar es Salaam. We rescheduled a couple times but ended doing it on 10th January, 2017.
I wanted a casual simple black and white look. Also I was thinking backlight and white colors. So, I used the white silk like material that I use a lot for my backlight work and white bedcover that the model brought since I didn’t have any. The white silk material like I bought it for $1 per meter and its 2 x 1 meter.
This was the first time I met Mariam in person. But we were very comfortable with one another since we already established some sort of friendship through communicating on snapchat. Let me take you to how the shoot went down.

Camera: Nikon D7200 Aperture. f/6.3 Shutter: 1/320 sec ISO: 800 Focal Length: 50mm

Camera: Nikon D7200 Aperture. f/6.3 Shutter: 1/320 sec ISO: 800 Focal Length: 50mm
Setting
I put the white bed cover on the bed obviously and I used the simple silk like cloth as a shoot through for the backlight. I put the white silk cloth as a curtain using pegs on the window and set one flash on a light stand with a wireless trigger outside the window so as to shoot through the white silk cloth. The flash was set 1 feet away from the window. I pushed the bed closer to the window where the white silk material was positioned. I also had a second flash on a light stand with a wireless trigger pointing up the ceiling. The ceiling was white so I used it as a modifier to bounce light back to the model on the bed. Also since the bed had white bedcover it also acted as a reflector The outside flash shooting through the white silk material was set to 1/4 power and the flash inside the room was set 1/16 power. However, I was occasionally changing the power of the flash that was inside.
Shooting
We started with a gown. So I had to do some elegant simple poses. Also, I had a minor challenge of space, I was working with was a small window where the white silk material was and I had to frame my subject within that small window size. That meant I had to shoot the whole session in mostly portrait orientation. Then we had a boyfriend jeans look, which was my fav one. I still had to stick to shooting in portrait orientation mode.

Camera: Nikon D7200 Arperture. f/5 Shutter: 1/200 sec ISO: 200Focal Length: 40mm
“use what you have. do what you can”
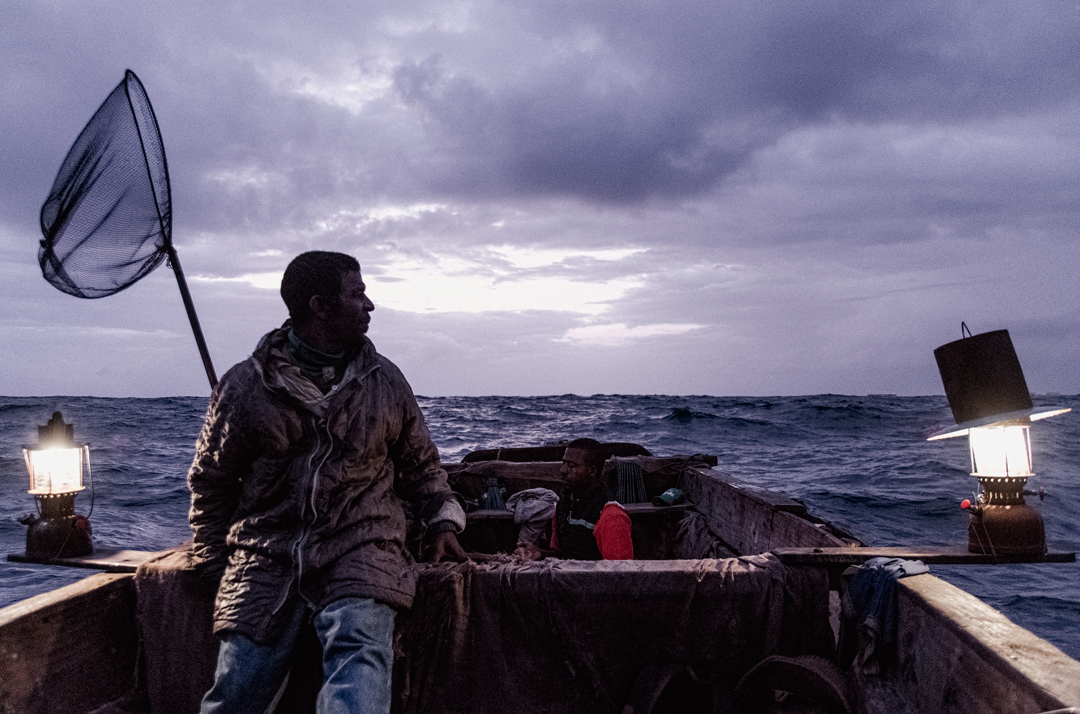
Fishing Trip In Kigamboni, Dar es Salaam.
Documentary photography excites me because I love to tell stories through photos. The other part that most interest me is the uncertainty and the adventure that unfolds when embarking in such assignments. However, this shoot was not an assignment but rather a personal shoot to add to my portfolio. I did this shoot on 27th September - 28th September 2016. The following is the story behind the images.
I went to Kigamboni the day prior to the shoot to ask and find the people that are going to fish so as I can join them and be able to make some powerful images. To be specific I was looking for a guy who has a boat. I found one had a talk with him and he introduced me to two other fishermen Shabani (Captain Shimbi) and Juma. I greeted the guys and we agreed to meet the next day to go fishing with them. The fishing trip was supposed to be during the night, we were supposed to spend the night on the sea. We agreed to meet the next day at 5:30 pm.
The morning after. We are heading back to the port. Front: Shabani (Captain Shimbi) enjoys the sea view. Back: Juma is praying. Camera: Nikon D7200 ISO: 4000 Shutter: 1/80 sec. Aperture: f/2.8 Focal Length: 17mm.
5:30 pm, I was there accompanied by my cousin. Well prepared for spending the night on the sea with our jackets and some snacks in our backpack. So we waited for the guys as they prepared the boat and packed all the requirements. We were supposed to start our journey into the sea by 06:45 pm. So I took upon that time to interact with Shabani and Juma.

The Morning After. Shabani (Captain Shimbi) removes the lamp. Camera: Nikon D7200. ISO: 560 Shutter: 1/100 sec Aperture: f/2.8 Focal Length: 35mm
7:00 pm we are on the boat sailing and trying to find the first place to start fishing. In my documentary work, I do not like to pose my subject if I don’t have to. I let my subject be and let them relax in their native environment. I know I won’t make some great images in the fast instant. But after they are comfortable with me and have interacted with them for a while then I get the images I want. I want them at first to know that yes I am the guy with the camera but still that should not hold us to get along. If they are comfortable then I can pose them if need be, but most of the time I don’t pose them. How they react to their environment that is what I want to portray and they only react naturally if you don’t pose them.
Ok, let us get back to the boat! Now we found a fishing spot and we are ready to try our luck. They lowered the anchor into the sea. Then Captain Shimbi started preparing lamps so as we could have light because it was totally dark. The light would also trick the fish to come up.

Shabani (Captain Shimbi) setting up the lamp so as to start fishing. Camera: Nikon D7200 ISO: 100 Shutter: 1/500 sec Aperture: f/1.8 Focal Length: 50mm
I took the above picture while captain Shimbi was setting up the lamps. I shot it with the highest aperture of my lens the 50mm f1.8. I also needed to freeze the motion we were in the boat and it was not steady so I used 1/500 shutter and ISO 100. I used ISO 100 because I knew my subject was already lit with the lamp properly and there was enough light on his face. Also, I wanted a low key image. This was my favorite image on that trip.
Long story short, the day was not that great for the fishermen they did not get any fish, though we almost got four. It was raining at some point, they were many challenges of shooting because it was very dark. But the overall experience was amazing and would definitely do it again but well prepared.
What Is In My Camera Bag
Hello, guys! Hope you are all well. Most photographers usually ask me what type of gears I use and I truly never like this question. Because at the end of the day, it’s not about the gear, it’s about what you can do with it. We photographers forget that the camera does not shoot itself. So we should not be overwhelmed with the fancy equipment. One should use her gear to its maximum to produce the best result from that particular gear. We should also develop aesthetically in our photography. That is what is going to make one stand out as a photographer. Find the cameras I have used in the past here.
I have very few equipment. I am only going to list the main equipment. Of course, I have things like light stands, chargers, memory cards, computer, backpack etc. but that is a discussion for another day or something you are going to be seeing in my BTS Videos. I will be reviewing equipment in the future but for now, let me just give you the list. This equipment list will also be useful to people starting photography.

My Photography Equipment
Camera
Nikon D 7200. Yes! I only have one body that is what I have been using in the past year. If I need to shoot events or need two cameras for some reasons then I rent.
Lenses
Nikon AF-S Nikkor 50mm 1:1.8 G. 90% of my shoots I use this lens.
Tamron SP 17 – 50 mm f/2.8 – I use this mostly for events and wide angle shoots when doing portraits.
Flash / Speedlight
2 Alturas Photo Flash – 1 is TTL flash and 1 is Manual. Also I have two wireless triggers and one receiver. I intend to add two more flashes this year.
Video Light – No brand. Chinese version.
Lambency Diffuser – No brand. Chinese version.
Reflector. No Brand. Chinese Version.
2 White shoot through umbrellas – No Brand Chinese Version.
Octagon Soft box – No Brand. Chinese Version.
Beauty Disk – No Brand. Chinese Version.

The No Brands – (Chinese Version) have been working fine for me and still doesn’t break my wallet. The only thing I have had minor problems with is the video light but then again it has been knocked way too many times so I expect it to react that way. I try and save money all the time and buy gears which I only truly need.
There you have it those are the main equipment that I use in my shoots and have been using for the past year. What are the main equipment that you have? Does it get the job done for you?
Shooting with Natural Light
Natural light is just amazing. It brings realness in a photo. I always consider natural light before anything else in my shoots. If I need to add another source of light then I will add it. Also during the night I try to see if I can work with ambient light. But most of the time during the day I shoot using natural light and that is especially if I am shooting on location and not in a studio.
Nose towards the Light
As Scott Robert Lim puts it. Face your subjects towards the light source. If you are working with the sun this would highly depend on the time of the day and also how strong the sun is. I diffuse the sunlight using the translucent part of the reflector if the sun is too hush. This will bring large soft light to the subjects face also it will give it beautiful catch lights in the eyes. The catch lights will make the eyes pop and bring life to the subject’s face

The subject in this photo faces the the light source (SUN). That is why we see shadows falling at the back.
Camera: Nikon D7200 Shutter: 1/200sec Aperture: f/ 11 ISO: 100 Focal Lenght: 24mm
Bounce The Light
If there is a beautiful surface then you can use it to bounce light to your subject, but this might also make the subject have the color of the ground you reflected from, so be sure to white balance or color correct later in post if the subject has funny colors reflecting from the ground . You can always use a reflector to bounce the light source to the subject, always make sure the subject is in a shade so as you can have proper exposure and a soft light to the subject.

I put the subject in a little shade, put a reflector down below his waist which was reflecting the sunlight.
Camera: Nikon D7200 Shutter: 1/100sec Aperture: f/ 4.0 ISO: 100 Focal Length: 50mm
Back Light
You can also always use the sun as a backlight if it is too hush. The subject will have great rim light on their head. This will bring a little bit of dramatic light. When shooting backlit be sure to expose for the subject. You might also use a flash or a video light to add light to the subject if the subject is underexposed.

The subject's back was facing the light source which created a beautiful background. I overexposed the background so as the subject can be seen clearly.
Camera: Nikon D7200 Shutter: 1/100sec Aperture: f/ 5.0 ISO: 100 Focal Length: 35mm
Indoors
It is also great shooting indoors with natural light. The light might be diffused using curtains or not diffused at all. For instance, at this point, you can use a window or door. You put and face your subject towards the source of light be it a window or door.
There you go how I do it using natural light. Hope it's helpful to you!
Black and White Photography Love!
There is a thing about a monochrome image, one always wants to take a moment to appreciate and study the image. A black and white image is timeless, classical and powerful.
Friends always tease me on the love I have for monochrome. I have never performed a photo shoot without at least a couple of images ending in black and white. The masters who made me fall in love with black and white photography are Greg Gorman, Peter Coulson, Patrick Demarchelier and Herb Ritts.
I always try to keep it simple in my black and white images and tend to use one light or just stick with natural light. At the moment I am experimenting with different techniques and tricks so as in the end I can come up with my own signature black and white photography style.

Camera: Nikon D3200 Focal Length: 50mm Shutter Speed: 1/50sec Aperture: f/3.2 ISO: 3200

Camera: Nikon 7200 Focal Length: 50mm Shutter Speed: 1/200sec Aperture: f/2.8 ISO: 200
Shooting for Black and White
It is always helpful and becomes easy in post-production if you intend to shoot for black and white. This does not necessary mean you should use the black and white setting in your camera, NO I would not recommend that. If you shoot black and white with the camera’s setting the images will be JPEGs and then you will lose much data which won’t quite help in post-production. So always shoot RAW files, which will later give you total control in post-production.

Camera: Nikon D7200 Focal Length: 35mm Shutter Speed: 1/160sec Aperture: f/9.0 ISO: 100

Camera: Nikon D7200 Focal Length: 50mm Shutter Speed: 1/160sec Aperture: f/9.0 ISO: 100
I always shoot RAW and under expose to -1 to -2. When I underexpose I see the shadow clearly which I know will later bring drama and contrast when changed to black and white. I mostly use one light source whether it’s natural light or a flash. When shooting women I always face them towards the light unless if I am creating a silhouette. For men, I create a different type of drama without too much to worry because black and white always make them look good. I would say 99.5% of Images of Men I have shot are Black and White. Black and white is powerful and you always want to portray men as powerful.
Post Production: Lightroom
After shooting underexposed in camera then I take the images to Lightroom. I don’t complicate my editing flow in Lightroom since it's already designed to simplify my editing process.
Basic Panel
I basically start from the basic panel going down. First I change the image to black and white, in the basic panel. Then play with temp and tint. I never change the exposure at this point. I only play with shadows and highlights. Most of the time I tend to increase the shadows and highlights which will create a more dramatic low key image. I increase clarity and play with black and white if needed in that particular Image.
Tone Curve Panel
I always set it to Medium Contrast and tweak with the shadows and highlights if I needed to increase more drama to the image or reduce it if too much.
Details Panel
Here I increase the sharpness of the image. The following are the settings that I always have in my details panel for my black and white photography. Keep in mind that clarity in the basic panel also increases sharpness so play with both to your liking. I don’t reduce noise because I always soften it up in Photoshop. I also like noise in my image so as to bring texture to the skin so as the image can look real. That is why I am never afraid to shoot with high ISO.

After those minor tweaks in Lightroom, I take the image to Photoshop and do the final adjustments. I use Photoshop to remove wrinkles, unwanted spots and also at times to increase contrast and texture.